威联通_LNMP安装wordpress__第五篇安装redis
1.前期准备
[root@LNMP ~]# yum install php-redis
[root@LNMP ~]# mkdir -p /data/nginx/html
[root@LNMP data]# chown -R nginx.nginx /data/nginx/html #可忽略
[root@LNMP data]# rsync -av root@192.168.50.49:/usr/local/nginx/html/wordpress /data/nginx/html #可忽略
[root@LNMP ~]# wget -c https://download.redis.io/releases/redis-6.0.9.tar.gz
2.安装redis
[root@LNMP ~]# cd /usr/local/src/redis-6.0.9/src
[root@LNMP src]# vim Makefile
 改:32 PREFIX?=/usr/local/
 为:32 PREFIX?=/usr/local/redis
[root@LNMP src]# cd ..
[root@LNMP redis-6.0.9]# make PREFIX=/usr/local/redis MALLOC=libc install
#报错:
make[1]: *** [server.o] Error 1
make[1]: Leaving directory `/usr/local/src/redis-6.0.9/src'
make: *** [install] Error 2
#原因是因为gcc版本过低,yum安装的gcc是4.8.5的。因此需要升级gcc,升级过程如下:
[root@LNMP redis-6.0.9]# yum -y install centos-release-scl
[root@LNMP redis-6.0.9]# yum -y install devtoolset-9-gcc devtoolset-9-gcc-c++ devtoolset-9-binutils
[root@LNMP src]# scl enable devtoolset-9 bash #临时修改
echo "source /opt/rh/devtoolset-9/enable" >> /etc/profile #修改环境变量
[root@LNMP src]# gcc -v
Using built-in specs.
COLLECT_GCC=gcc
COLLECT_LTO_WRAPPER=/opt/rh/devtoolset-9/root/usr/libexec/gcc/x86_64-redhat-linux/9/lto-wrapper
Target: x86_64-redhat-linux
Configured with: ../configure --enable-bootstrap --enable-languages=c,c++,fortran,lto --prefix=/opt/rh/devtoolset-9/root/usr --mandir=/opt/rh/devtoolset-9/root/usr/share/man --infodir=/opt/rh/devtoolset-9/root/usr/share/info --with-bugurl=http://bugzilla.redhat.com/bugzilla --enable-shared --enable-threads=posix --enable-checking=release --enable-multilib --with-system-zlib --enable-__cxa_atexit --disable-libunwind-exceptions --enable-gnu-unique-object --enable-linker-build-id --with-gcc-major-version-only --with-linker-hash-style=gnu --with-default-libstdcxx-abi=gcc4-compatible --enable-plugin --enable-initfini-array --with-isl=/builddir/build/BUILD/gcc-9.3.1-20200408/obj-x86_64-redhat-linux/isl-install --disable-libmpx --enable-gnu-indirect-function --with-tune=generic --with-arch_32=x86-64 --build=x86_64-redhat-linux
Thread model: posix
gcc version 9.3.1 20200408 (Red Hat 9.3.1-2) (GCC)
#再次make install
[root@LNMP redis-6.0.9]# make PREFIX=/usr/local/redis MALLOC=libc install

3.配置redis
[root@LNMP redis-6.0.9]# mkdir -p /usr/local/redis/6379
[root@LNMP redis-6.0.9]# cp redis.conf /usr/local/redis/6379/6379.conf
#前端启动
[root@LNMP redis-6.0.9]# ls /usr/local/redis/
6379  bin
[root@LNMP redis-6.0.9]# cd
[root@LNMP ~]# /usr/local/redis/bin/redis-server /usr/local/redis/6379/6379.conf
#有警告,配置有问题

#修改sysctl.conf
[root@LNMP ~]# vim /etc/sysctl.conf
net.core.somaxconn=512 #1表示内核将所有的物理内存给进程,保留swap,2表示,所有内存,包括swap都给进程
vm.overcommit_memory=1

[root@LNMP ~]# echo never > /sys/kernel/mm/transparent_hugepage/enabled #让redis负责内存管理
[root@LNMP ~]# sysctl -p
net.core.somaxconn = 512
vm.overcommit_memory = 1
#后端启动
[root@LNMP ~]# nohup /usr/local/redis/bin/redis-server /usr/local/redis/6379/6379.conf &
[1] 3084
[root@LNMP ~]# nohup: ignoring input and appending output to ‘nohup.out’
#关闭进程
[root@LNMP ~]# /usr/local/redis/bin/redis-cli -p 6379 shutdown
[1]+  Done                    nohup /usr/local/redis/bin/redis-server /usr/local/redis/6379/6379.conf
#配置启动脚本
[root@LNMP ~]# cp /usr/local/redis/bin/redis-server /usr/local/redis/bin/redis6379-server
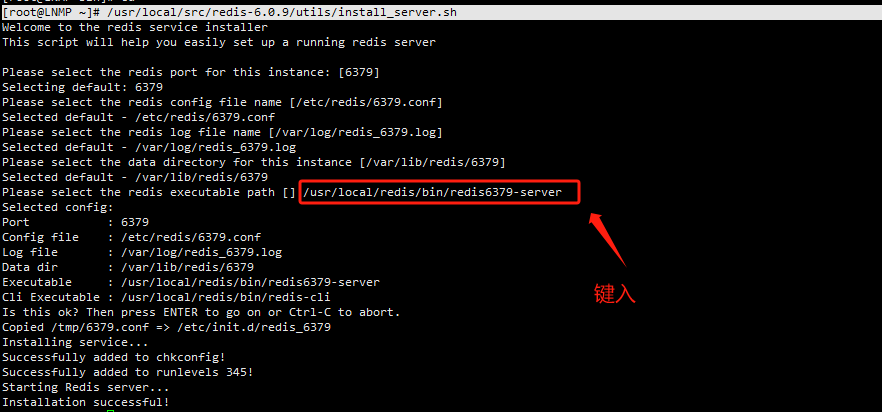
[root@LNMP ~]# /usr/local/src/redis-6.0.9/utils/install_server.sh
#报错

#注释掉
[root@LNMP ~]# vim /usr/local/src/redis-6.0.9/utils/install_server.sh

#再次运行
[root@LNMP ~]# /usr/local/src/redis-6.0.9/utils/install_server.sh
现在可以使用/etc/init.d/redis_6379 start stop restart了
编译redis配置文件
[root@LNMP ~]# vim /usr/local/redis/6379/6379.conf
69 bind 0.0.0.0    #监听IP,本机IP或127.0.0.1或0.0.0.0
92 port 6379       #监听端口
224 daemonize yes  #后端运行

308 #save 900 1
309 #save 300 10
310 #save 60 10000

改:1090 appendonly no
为:1090 appendonly yes #开启aof持久化,默认为no,不开启

1094 appendfilename "appendonly.aof" #aof数据文件名
1119 # appendfsync always  #当键值有变化时,写入
1120 appendfsync everysec  #每秒写入,同步数据到磁盘
1121 # appendfsync no      #写入操作由操作系统完成,注释掉

改:1142 no-appendfsync-on-rewrite no
为:1142 no-appendfsync-on-rewrite yes    #当rdb写入时,停止aof写入,这里没有开启rdb,此条不起作用

1161 auto-aof-rewrite-percentage 100     #aof文件增长100%时,重写
1162 auto-aof-rewrite-min-size 64mb      #aof文件大于64M时,重写

1186 aof-load-truncated yes              #aof文件加载时,忽略最后一条命令

其他默认
#重新启动redis
[root@LNMP ~]# /etc/init.d/redis_6379 restart
Stopping ...
Redis stopped
Starting Redis server...
[root@LNMP ~]# ps -ef | grep redis
root      3280     1  0 07:23 ?        00:00:00 /usr/local/redis/bin/redis6379-server 127.0.0.1:6379
root      3285  2642  0 07:24 pts/0    00:00:00 grep --color=auto redis
4.连接wordpress
wordpress连接 redis

如果没有连接上
这里是因为object-cache.php这个文件没有被复制到wp-content目录下,你只需要将以下目录下的文件/wp-content/plugins/redis-cache/includes/object-cache.php 复制到wp-content下就行啦。

查看插件

如果看到这些信息,证明成功了。
5.实例测试:
查看redis-cli,看是否有KEY产生
/usr/local/redis/bin/redis-cli -p 6379
127.0.0.1:6379> KEYS *

新增注册一个BBB的账户

登陆BBB账户

然后数据中删除

然后打开无痕浏览器的模式,重新登陆BBB账户,如果能登陆成功,证明redis已经缓存了
